3D Product Rendering vs. Product Photography
The CAD files are approved, the launch date is fixed and the first physical sample is still weeks away. For a lighting manufacturer preparing a new pendant family, this is the moment when product rendering vs product photography stops being a theoretical debate. Marketing needs product images for the launch campaign, sales needs promotional materials for distributors and the e-commerce team needs product pages ready before the first unit ships.
Most brands no longer treat the choice as either-or. Traditional photography still records details that buyers trust, while 3D visualization removes the dependency on a finished sample. This guide compares both methods on image quality, total cost, speed and fit by product category, then explains how a hybrid workflow operates in practice. The examples focus on furniture, lighting and interior products, the categories where the trade-offs are most visible to product design leadership.
Differences Between 3D Rendering and Product Photography
The differences between 3D rendering and product photography begin long before the final image: one method records a physical object, the other builds the image from data. That distinction shapes internal approvals, budgets and how early marketing can start. The stakes on product pages are high. Baymard Institute’s 2026 product page benchmark found that only 48% of leading US and European e-commerce sites deliver decent or good product page UX. The finding does not favor either method. It simply shows how much room remains for clearer product presentation, whichever way the images are produced.
Traditional Product Photography and the Physical Sample
Traditional product photography depends on a market-ready physical sample. The photographer can only work with the actual product that arrives at the studio, so the image schedule follows the production schedule. Any flaw on the sample ends up in the frame or in retouching. In return, photography captures the real object exactly as it exists. That is why classic product photography remains the reference point for accurate materials and geometry.
3D Visualization Built From a Digital Model
3D product rendering starts from data instead of a sample. Artists build a digital model from CAD files and technical drawings or import the engineering model directly. They then assign physically based materials using material references and light the scene in software. The physical product does not need to exist yet. Once approved, the same model produces white backgrounds for catalogs, lifestyle scenes for campaigns and close-ups for product pages. The trade-off is upfront work. Product modeling and material development take time. Accuracy depends entirely on the quality of the input data.
3D Rendering vs Product Photography Image Quality and Creative Control
In the 3D rendering vs product photography comparison, image quality is rarely the deciding factor today. A skilled studio can deliver both at a photorealistic level. The real difference is creative control. A photographer controls light, angle and set within the limits of physics and budget. A 3D artist can move the sun, change the room, swap a finish or add a different angle after approval without rebooking anything. Resolution is flexible as well: the same scene can be rendered for a web thumbnail or a large-format trade fair print without a new session.
Material Properties and Light Behavior
Material properties decide whether a render reads as real. Glass, brass, linen and oak each handle light differently, so artists calibrate materials against physical swatches or reference photos, not color codes alone.
Maintaining Accurate Colors and Brand Consistency
Photography can shift color between shoots and lighting setups. A render reproduces the same material values every time, keeping each color variant identical across catalog, website and trade fair stand.

What Product Rendering vs Photography Really Costs
Comparing only the price per image is misleading because most of the cost sits outside the shot itself: building and shipping samples, booking studio days and reshooting whenever the design changes. A fair comparison of product rendering vs product photography counts every step from sample to approved file, then multiplies it by the number of products, finishes and image types a launch needs: catalog packshots, product page views and lifestyle shots. Volatility matters too. Statistics Canada reported that furniture and related product manufacturing sales reached CAD 1,277 million in July 2026, a 5.0% increase in a single month, a reminder of how quickly production plans can change and why a flexible visual pipeline is worth more than a fixed photo schedule.
Product Rendering vs Product Photography Cost Per Image
Price lists usually quote a cost per image. For a single image of an existing product, photography wins on price more often than not, because a rendering budget front-loads product modeling, material setup and scene creation into the first frame. Take the new pendant family from the introduction as a hypothetical example: the tenth view, the third material variation and the ambient shot reuse that work, so each costs a fraction of the first. With photography, every new shot needs its own setup and time on set.
Photographer Fees and Studio Rentals Behind Every Photo Shoot
A professional photo shoot bundles cost lines that rarely sit in one quote: photographer fees, studio rentals, set building, styling, retouching and the product team’s own time. Large items add freight and insurance. Room sets may also need an interior stylist and furniture hire. These costs come back every time the brief changes, so the more often a catalog is updated, the more photography really costs.
Is 3D Rendering Cheaper Than Photography Across Large Catalogs
Is 3D rendering cheaper than photography across a full product range? The answer depends on how many variants the range contains. Take the hypothetical pendant family again: 4 sizes, 3 finishes and 5 required angles already add up to 60 packshots before a single lifestyle image. Photography needs every combination on set and a physical sample of each finish. A 3D pipeline builds one model per size, defines three materials once and renders all combinations from the same scenes. For large catalogs, this multiplication is where rendering wins on budget, not on the first image.
Cost Effective Choices for Small Brands and Smaller Businesses
For small brands, the biggest saving is often not the image itself but the capital it frees up. Photographing a range in every finish means producing a sample of each one first, money locked in prototypes before a single sale. Renders let a small team show the full range online, see which finishes customers actually choose and then produce only the bestsellers. A fixed project price also makes visuals a predictable, cost effective line in a tight budget. Even when the product exists already, smaller businesses can reuse one model for the website, marketplaces and print.
How Reusable 3D Models Reduce SKU Visualization Costs
A finished 3D model is an asset rather than a one-off expense. The same product can return in next year’s catalog or a new room setting, with new angles and updated finishes reusing the existing geometry. Savings also grow from SKU to SKU: products in one family share parts like the canopy, cable and mounting, so each new size needs only its unique parts combined. A new collection can also start from a library of approved materials.
Hidden Costs of Product Revisions and Reshoots
Design changes after a shoot are where photography budgets break. A revised handle or new fabric means a new sample, another studio booking and more retouching. These re-shoots rarely appear in the original plan. In 3D, only the model and its materials change, while existing scenes are simply re-rendered.
Calculating ROI Across an Entire Product Line
A useful ROI model compares total cost of ownership over a product line’s life, not the first invoice. For photography, count samples, logistics, studio days, retouching and reshoots. For rendering, count modeling, materials, scenes and reviews. Then compare what each method delivers over two or three seasons, including consistent product imagery.

Speed From Brief to Final Image
Photography waits for the product, while rendering waits for the data. Both wait for approvals. Even Shopify’s guide to a streamlined product photography workflow starts with preparing the physical product, so the clock only starts once a finished sample arrives. A 3D pipeline needs preparation too, but it starts from data instead: validated CAD data, reliable material references and a decision-maker available for reviews.
Where 3D Product Rendering vs Photography Advantages Show Up in Delivery Time
The 3D product rendering vs photography advantages in delivery time come from parallel work. A structured studio workflow typically delivers a first preview within about a week and final files within two weeks of brief approval, including two revision rounds. Photography can be faster once a sample sits in the studio. The real difference is the starting line. Rendering can begin while tooling is still being finalized. Photography cannot start until the sample is built, shipped and prepared.
Launch Campaign Deadlines Through the Lens of 3D Product Rendering vs Photos
Seen through the lens of 3D product rendering vs photos, a product launch calendar changes shape. Marketing campaigns, trade fair graphics and pre-order pages can be built from approved renders while the first production batch is still running. This matters most for crowdfunding campaigns and early pre-sales, where visuals must exist before the product does and must create the desire to buy.
3D Product Rendering vs Photography Benefits for Color Variants and Re-Shoots
The 3D product rendering vs photography benefits are easiest to see in variant turnaround. A new finish in an approved 3D scene is a material update and a re-render. In photography, it needs its own sample, a free studio slot and the original lighting rebuilt exactly. That rebuild is time consuming, which is why late additions to a photographed range often look slightly different.
Shipping Physical Samples and Other Logistical Nightmares
For large furniture and lighting systems, sample handling can become a logistical nightmare. A sofa has to be crated, insured, shipped, assembled and returned, while customs and transit damage add risk. Each transfer also takes a prototype away from the engineers who still need it. A 3D workflow moves files instead of crates: CAD data, drawings and swatches are usually all a studio requires.
Managing Last Minute Design Changes Without Delaying Launches
Late design changes are normal in product development. A cable length changes, a canopy becomes slimmer, a fabric supplier switches. With photography, a change after the shoot forces a choice between delaying the launch and publishing outdated images. With rendering, only the model is updated and the affected scenes are revised, far faster than producing a new sample and reshooting. Because geometry, materials and lighting are approved one by one, a late change only affects the stage it touches.
Scaling Visual Content Across Multiple Product Lines
Scaling visual production is less about volume than about consistency. Several product lines shot at once need a larger crew or a longer schedule, which raises the risk of mismatched lighting. A 3D pipeline keeps cameras, light rigs and material libraries identical across lines, with quality tiers matched to each line’s commercial role.

When to Use 3D Rendering Instead of Photography Across Product Categories
Under the EU Ecodesign for Sustainable Products Regulation, furniture is among the priority product groups and a Digital Product Passport framework will carry product information. Accurate visuals that match the technical data will matter more as product information becomes digital. Deciding when to use 3D rendering instead of photography comes down to three questions: does the product exist yet, how many variants does it have and what must the image show the buyer? The scenarios below show how these answers play out across product categories, settings and launch stages.
Furniture, Lighting and Interior Products Where Rendering Wins
Furniture, lighting and interior components favor rendering for three reasons: many configurations, large size and strong dependence on context. A modular sofa may exist in dozens of fabric and leg combinations. A lighting system has to be shown lit and unlit. Wall panels or kitchen fronts need room-scale settings no studio can stage cheaply. Product visualization before series production also lets art directors and sales teams review the range while tooling is still open.
Food and Fashion Accessories Where Photography Wins
Some categories still favor the camera. Food photography relies on texture and moisture that are expensive to simulate. In such cases, AI visualization can support the rendering process by adding realistic surface texture that would be costly to build in pure 3D. Fashion accessories such as leather bags or jewelry depend on surface detail that buyers inspect closely. Organic products with natural variation often look more credible photographed. Where the item already exists and rarely changes, most teams choose photography, since static photos remain the strongest proof of authenticity.
Lifestyle Scenes Without a Location Shoot
Lifestyle shots are where rendering offers the most creative freedom. A garden lounge chair can appear on a sunny beach or a hotel terrace without a single flight, permit or weather delay. Scenes can also match the target market, from compact European apartments to spacious North American homes. The most convincing scenes rely on emotional realism: soft light, a folded blanket or a turned page that makes the space feel lived in.
Product Photography vs 3D Model for Interactive and Augmented Reality Content
For interactive formats, the product photography vs 3D model question has a clear answer. Static images stay fixed to the studio or location where they were taken. Augmented reality places a digital model of the product into a real environment through a phone or tablet camera. The model holds true scale as the viewer moves around it, so buyers can check proportions, finishes and placement in real light before ordering. Most AR experiences open from a simple QR code without installing an app.
Hybrid Workflow Combining Photos and Renders
Most brands now run a hybrid approach in which the task decides the method. Renders cover catalog packshots, variant sets and lifestyle imagery produced before the finished sample exists. Photography covers material close-ups for verification, editorial content with people and social media moments. A common pattern is to photograph the first finished sample and use those images as reference photography to validate render accuracy. The result is one consistent visual system across product pages, catalogs and point-of-sale graphics in the physical store.
Choosing the Right Method for Each Launch Stage
The right method often changes as a product moves from concept to market. During concept reviews and pre-production marketing, 3D rendering carries most of the work: comparing design options, preparing trade fair material and supporting pre-sales. At launch, a hybrid split works best, with renders for variants and photos for detail. Once the product is in market, the existing model handles seasonal refreshes and new finishes, while photography of the produced item confirms finish, texture and color.
In practice, the choice is rarely fixed. Depending on the situation, renders and photos can both support the process as the product moves to market.

Render Vision Product Rendering Case Study
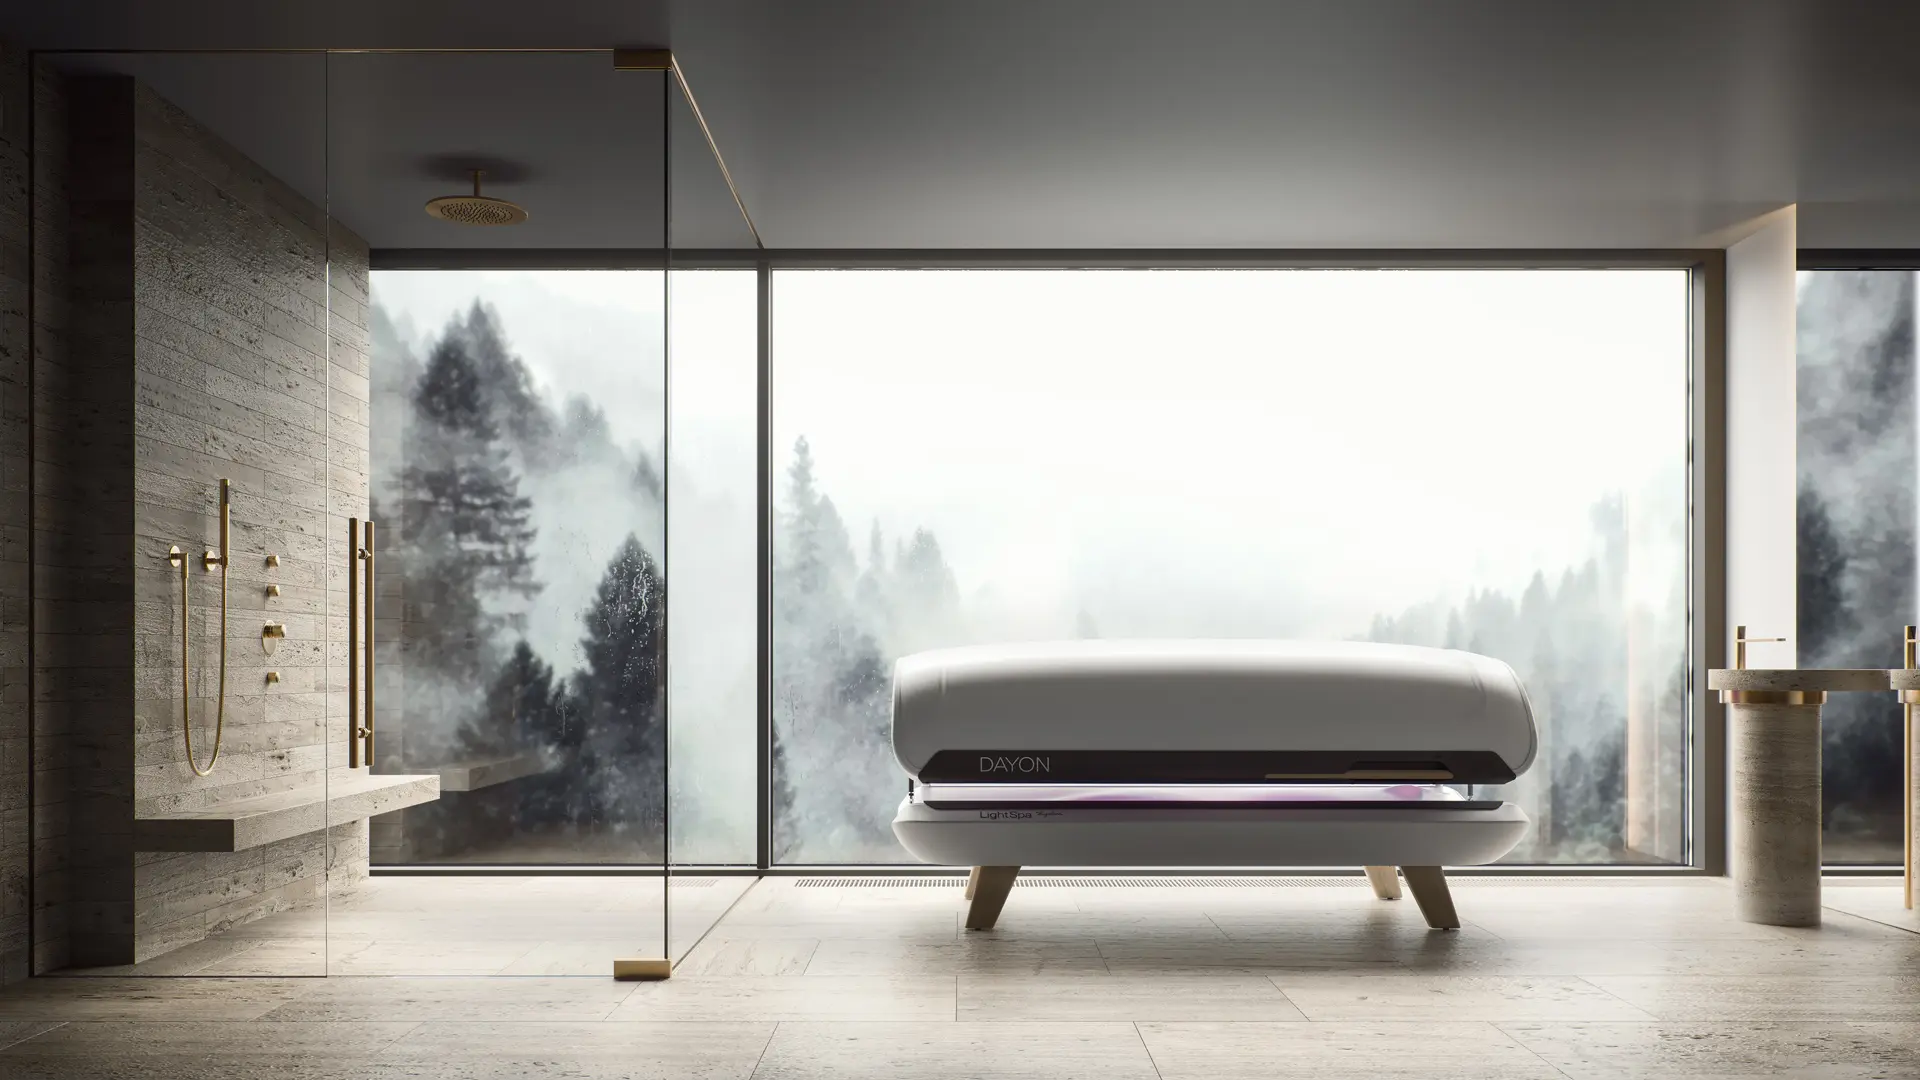
This case study covers Render Vision’s repeated collaboration with DAYON. It began in 2021 with the product visualization of the DAYON LightSpa, where the studio worked from the client’s CAD files and produced six photorealistic renders presenting the product as a private wellness retreat. Further series followed, including a set for the DAYON Recharge shown in several environments and color versions, from deep blacks to clean whites.
DAYON is the home light brand of JK Group, the company behind the Ergoline solarium brand. It develops light-based wellness devices for home use. Its range includes the LightSpa, a home solarium for natural tanning and UV-free light applications and Recharge, an LED device that uses red and near-infrared light for the whole body.

The Case Challenge and Client Goals
The challenge was to present it as more than a device: a private wellness retreat that buyers would want in their own homes. DAYON provided the product’s CAD files and a detailed description of the images it needed. The goal was a series of renders that showed the product’s features, design and function while placing it in lifelike settings that convey relaxation.

The 3D Visualization Pipeline We Used
The DAYON renders were created in close collaboration with the client’s team. Render Vision runs product projects through a structured five-step workflow, led by a dedicated project manager, an art director and a 3D artist. Pricing is fixed at project approval and deadlines are stated in the contract. Final images are delivered in JPG, PNG or TIFF at up to 5K resolution, higher on request.
Product Modeling From CAD Files
For the LightSpa, modeling started from DAYON’s own CAD files. After import, the team optimized the polygon count and removed internal parts that would never be visible in the renders. The first review checks proportions and construction before any materials are applied.
Validating Render Accuracy Against Reference Photography
When physical swatches or early prototype photos exist, they become the benchmark. Materials are compared side by side with the reference under neutral light. Color, gloss and texture scale are adjusted until the render matches the physical sample the client has signed off.

Results of the DAYON LightSpa Visualization
The final set presents the LightSpa as a private wellness retreat rather than an appliance, with detailed, lifelike environments built around the product. Thanks to clear collaboration between the Render Vision team and DAYON, the project moved from modeling to approved images quickly and smoothly, giving the brand a polished, ready-to-use visual set for its marketing.
What to Prepare Before Briefing a Visualization Studio
A complete brief shortens the path to the first preview and keeps revision rounds focused. The essentials:
- CAD files or technical drawings with final dimensions.
- Physical swatches, material codes or reference photos for every finish.
- A list of variants, required views and output formats.
- Mood references for lifestyle settings and the target markets they serve.
- Brand guidelines and the intended channels: web, print, trade fairs or retail displays.
A designated point of contact with the authority to sign off each project stage.

3D Product Rendering
vs Photography FAQ
Do 3D renders improve conversion rates and reduce product returns?
The most widely cited uplift figures come from vendors and platforms. They refer to interactive 3D and augmented reality, often measured among shoppers who chose to use those features. Reliable public evidence that static renders outperform photos is limited. An A/B test on comparable product pages gives the most trustworthy answer for a specific range.
Do computer generated product images need to be disclosed in advertising?
Accurate CGI generally needs no special label, but it must not mislead: the image has to match what the customer receives. AI-generated content is treated differently. In the EU, Article 50 of the AI Act has applied since 2 August 2026 and introduces disclosure duties for synthetic content. Specific campaigns deserve legal review.
How do AI generated product images compare with professional 3D rendering?
Generic AI image tools are fast for mood boards but cannot guarantee exact geometry or identical materials across a series. Render Vision offers two paths for product visuals: full 3D production from a measured model and a professional AI visualization pipeline both with several test and selection rounds, reviewed by the same art direction team. The path is agreed with the client at ordering.
Which software and render engines are used for photorealistic product visuals?
There is no single industry standard. CAD geometry typically comes from engineering tools such as SolidWorks or Rhino, while scenes are assembled in general 3D packages like 3ds Max, Cinema 4D or Blender. Render engines such as V-Ray, Corona, Redshift or Octane handle photorealistic output. KeyShot is popular for quick renders straight from CAD. The right combination depends on the product and the output it needs.
Who owns the 3D model and what usage rights does the client receive?
Ownership is defined by contract. At Render Vision, the native 3D model remains the studio’s property, while the delivered images are licensed for the uses agreed in the contract. The model itself can be transferred to the client for an additional fee. That option is worth agreeing before work starts if the range will be updated or reused.
Should a company build an in house 3D team or outsource to a studio?
An in-house team pays off with continuous high volume, stable product types and the budget for specialist artists, software and render hardware. Outsourcing suits fluctuating demand, launch peaks and projects that need art direction beyond packshots. At Render Vision, 80% of projects come from returning clients who use the studio as a long-term extension of their team.
Does replacing photo shoots with 3D reduce a company’s environmental footprint?
Rendering can remove emissions linked to shipping samples, travelling to locations and building physical sets. It also consumes electricity for computing. Because green claims face stricter scrutiny in the EU, any environmental statement should rest on a project-level comparison rather than an assumption. Until such data exists, the environmental side of product rendering vs product photography is best judged case by case.



Ready for a New View?
Contact Us to Receive a Free Quote


 powered by Borlabs Cookie